
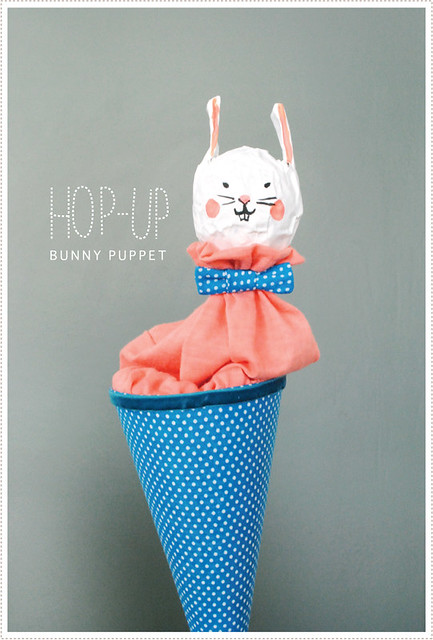
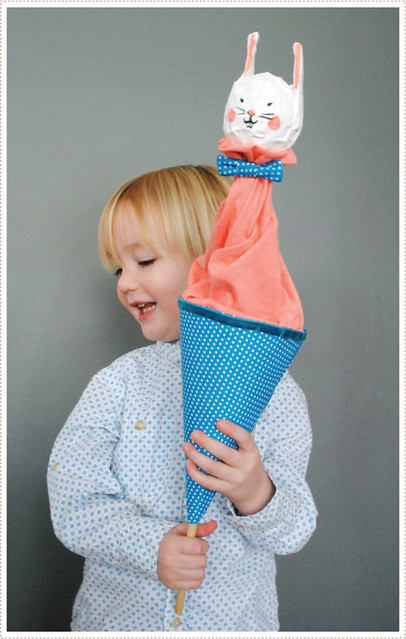
DIY Pop-Up Puppet
After Jon and I had been married for a few years Jon's parents went on a trip to Europe. Knowing our love of theater, puppeteering and European toys in general, they returned home with two pop-up puppets for us. I have loved having them around (as have the boys) and have often looked over at them, and thought, "you know, I really need to make my own version of one of these". And after I made these Halloween paper mache puppets, I knew right away, I wanted to do a version of these in pop-up form. So for Easter this year, that is just what we did.
TO MAKE THE RABBIT:
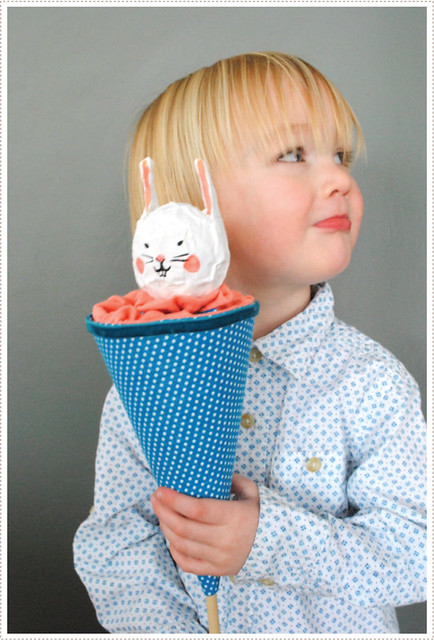
1. To get started on this, I created the paper mache rabbit head using the same technique I used in my Halloween puppets. I liked the sort of rough, vintage look of things so I kept the head a little imperfect. If you want to spend time smoothing the paper mache down, you can get a more refined look to yours.
2. When the rabbit head was dry and painted I then cut out a neck hole, making sure it was just slightly larger than the wooden dowel that I would be using to pop this puppet up and down. For this puppet I used a 5/16" round wooden dowel and cut the length to be 19 3/4" long.
3. I then stuffed the head with knit fabric (you could also use newspaper) on the sides, and a bit on the top, so that the dowel would fit snugly when it was placed inside the head. I then put gobs of hot glue on the top part of the dowel (about 1 3/4" from the top) and quickly placed it in the rabbits head. I then let this dry and sit for a few hours.
4. While the head and dowel were drying and setting, I created the salmon pink knit jumper in the same fashion as I did for the cat and pumpkin puppets. I then decided that our little hopper needed a bow tie and created one out of the fabric I would be using for the cone.
5. Once the dowel was securely set in the head, I placed the gathered end of the knit jumper onto the base of the rabbit, and hot-glued it securely to the head and dowel. I then hot glued the bow tie on afterwards (yes, I am kind of obsessed with hot glue - but you could hand sew the bow tie on if you wish). I then let that dry and set while I worked on the cone base.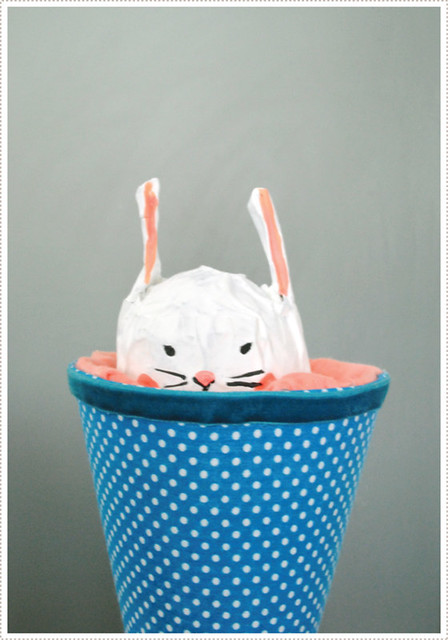
TO MAKE THE CONE: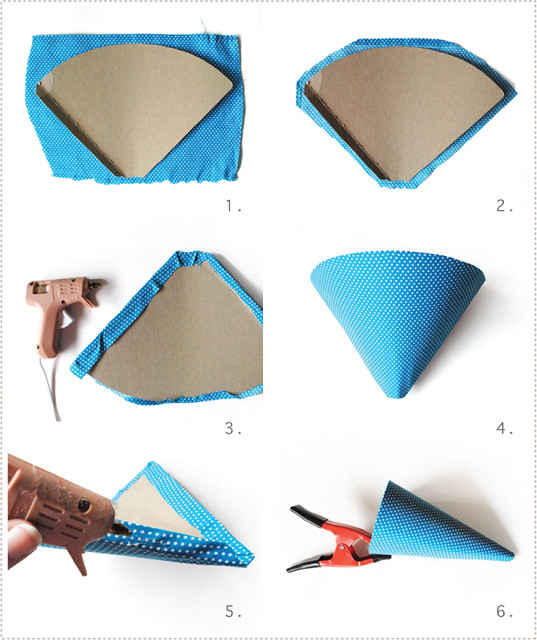
1. To make the cone, I created a template based on the European pop-up puppets I already had. To make your own, you can start by downloading my template for this here:
After printing the template I then traced it onto rigid chip board (actually taken from a stay flat mailer I use for shipping my prints in my shop, but you can use any sort of rigid chip board you might have lying around, such as a thick cereal box, etc.). Once the template was traced onto the board, I then cut it out and chose the piece a fabric that I wanted to use to cover my cone.
2. I then trimmed the fabric to be about 1/2" larger than the cone template on all sides.
3. Then using hot glue, I glued down all the sides of the fabric to the back side of the chip board.
4. I then shaped the board with my hand to form a cone like shape.
5. To adhere both sides of my fabric covered cone board, I ran a strip of glue down the side of the flap and quickly adhered the flap to the back of the other side of the cone.
6. To make sure everything set well, I clamped down the "seam" and let it sit overnight.
(I might suggest making the paper mache head and cone on one day, let them sit overnight and then paint and assemble the puppet on the next day).
FINISHING THE PUPPET:
1 Once the rabbit puppet and cone base were complete, I was ready to assemble it all together. I did so by placing the bottom end of the wooden dowel (with the rabbit head and jumper attached up top) through the cone. I did this by starting at the wide end of the cone and pushing it through the smaller hole at the bottom of the cone.
2. I then, once again, grabbed my hot glue and simply placed a ring of glue on the inside of the top of the cone and glued on the base of the rabbit jumper. I let this dry and sit for a bit.
3. I then added a piece of velvet ribbon around the top of the cone.
4. Let everything sit and dry for a couple of hours.
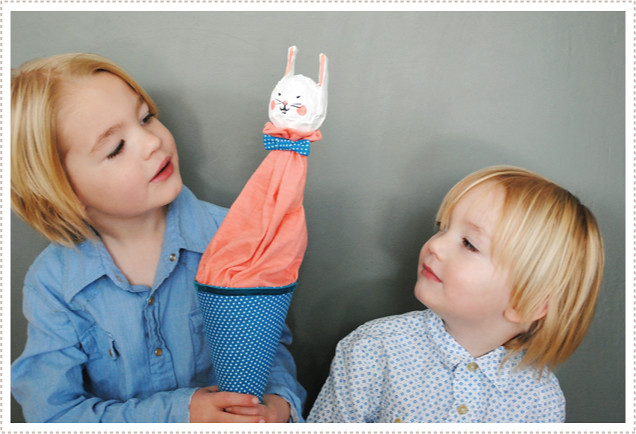
5. Once everything is set and dry, bring your Littles out and have fun, fun, fun with your new "hop-up" bunny puppet!
And fun, fun, fun is just what the boys had with our new little bunny friend. I love how easy it is for Little O (3) to puppeteer our new friend. He's really become quite the master.

And little A is quite the fan as well. They love taking turns creating puppet shows for one another.
The possibilities for pop-up creatures are endless and I'd love to have a go at a few more of these. I'm thinking a little bear, a squirrel and an elephant would be so cute.
What sort of creature would you have popping up out of your puppet?


This is so cute! I think I will try this with my daughters ;-)
ReplyDeleteThis is so so awesome Mer!
ReplyDeletecuteness in a cone perfect!
ReplyDeletegreat idea!!!
ReplyDeleteWe love this great idea, so cute!!!!!!
ReplyDeleteI love puppets, bunnies and paper mache! You've hit the goldmine and my heart! Wonderful!
ReplyDeleteHi there, I realise this is rather a long time since you posted this, but is it possible for me to get the template for the cone?
ReplyDeleteThanks,
Suzannah
Thank you for such a beautiful tutorial! I made a little puppet today and my children loved it.
ReplyDelete